Contact   Commercial-Bids   Historic-Repros   YouTube  Catalogs   Instagram   Facebook     Clearance
SEARCH  Name  Number   Material   Style   Policies   Paints   Finishes    Freight  Design-Theory

FACADES  House Fronts  Commercial   Columns   Capitals   Bases   Metal Posts     Railings   Shutters

CARVINGS   Appliqués  Corbels  Finials  Fireplace-Mantels   Kitchen-Posts   Niches   Legs   Rosettes

CEILINGS    Beams  Coffers  Domes  Medallions  Rings Tin-Ceilings  Trim-Corners  Vaults  Wall Decor

MOLDING  Arch  Bar-Rail  Baseboard  Brickmold  Casing  Crown  Frieze  Panel-Mold  Profile Match

EXTERIOR   Garden-Elements   City-Furnishings   Fountains   Signs   Statues   Trims & Walls


 Imperial Productions ®                               

 Medallion Installation Notes


styles of imperial medallions ornate to modern

  youtube movie covers styles, sizing and installation

    click above to watch Video


 1) Advisory Note   

Always use a professional certified electrician to install any electrical device that must be hard wired. These notes are guidelines only. For your situation, consult a professional and adhere to local building codes


 Weights:

Medallions are decorative only and do not hold weight. Any fixture must be hung by the electrical receptacle's threaded rod. For heavy fixtures, re-enforce the ceiling joists or rafters to hold the weight.


 2) Selecting the Right Medallion  


 Link to our collection of 300 Medallions


 3) Sizing the Medallion for your Light Fixture

  Sizing is based on the Golden Rule called PHi

  This is the ratio calculation PHi (1.618) 


  Here is a simple calculation to consider

  1- (.618) = (.382)  ie 38.2%

  This keeps within the Golden Rule of Phi


  18" medallion x 1.38 = a 25 inch medallion
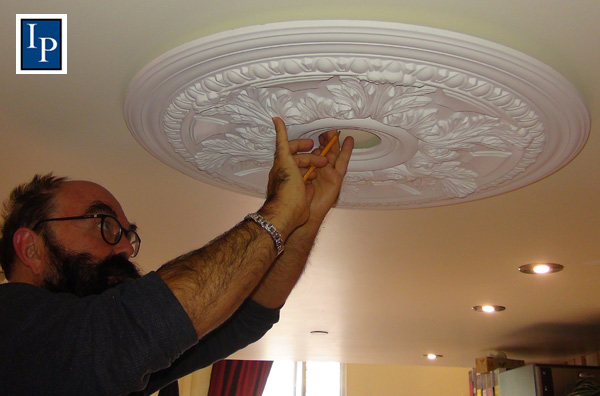
  

No rules rule so select 29", 25" or what ever matches your design. Always remember that when you view the medallion mounted on the ceiling it will appear much smaller from your perspective at a lower level.  By selecting one that uses the  golden rule calculation, it will appear to be the right size with the correct visual distortion


 4) Split Service & Hole Cutting 


 If required, all medallions can be split for reassembly so that you do not have to take down a chandelier.  We offer custom hole sizes and precision splitting services ... see the following page


 Link to Medallion Services


 5) Preparation   

 Power: Make sure there is no power to the receptacle box by turning off the breaker or fuse and confirm no power with an electric tester. Before you nail or screw into the ceiling make sure with a probe that there are no electrical wires in the proximity of where  you will be  nailing or screwing. Also beware of water pipes.


  Mark the Spot:

  Center the hole of

  the medallion to the

  receptacle box.

  Trace out the outside

  of the medallion

  on the ceiling

  with a pencil


Wear a mask and lightly sand and remove all dust or popcorn plaster (stucco) from the ceiling prior to install to ensure a flat surface


Special Note: Pre 1980 Beware that some popcorn ceilings contain asbestos check this out first and have a professional remove the popcorn coating


 The Hole: Most octagon ceiling receptacle boxes are 3-3/4 inches. Order your medallion with a precut specified hole or drill a hole  yourself

 See how we Drill Holes and Split medallions


 Paint the medallion before you install - allow 24 hrs to dry


 6) Get the Medallion Up There First !   


 The Approved Glue


 On various spots on the back surface dab the approved construction adhesive


Note: wear gloves read and follow the manufacturer's warnings


The back of the medallion should not be painted and should be rough sanded if necessary so the glue will adhere


ArchPolymerTM

Limited Warranty is void unless the approved adhesive is sold with the medallion or panel. Some construction adhesives are solvent based glue that may melt the product


Approved Construction Adhesive


Use 4 screws to temporarily hold the medallion or preferably use a brad nailer to affix the medallion to the ceiling Use only a few brad nails as they are just holding the medallion till the adhesive dries


In the case of Neo-Plaster-GRG use screws only and countersink them to be filled later


Check to make sure the medallion is level on all sides. If it is not use a small wedge to pry one side downward until all sides are even. This is the time to correct any unevenness before the glue dries. Make sure you have pulled the wires through the center hole.


 7) Fixing and Filling the Medallion   

 Allow 24 hours for the glue to dry


Once dry use the approved Poly Spackling Compound to fill any holes and gaps between the ceiling and the medallion


Wet sand OR let dry and sand the Spackle prior to painting  


We do not recommend caulking as it may shrink and cannot be sanded. Only certain caulking can be painted thus the spackling compound is a better product


 8) Once the Medallion is Installed 

 Photo shows the octagon box in the ceiling, the canopy which is part of the chandelier


  The metal bar is affixed to the octagon box with the threaded rod turned into it
  The canopy is held to the medallion by the small ring
  the canopy is placed up to the medallion and does not go through the hole


  9) Electrical Hook Up  


 Electrical hookup - wires go though the threaded rod and should be installed by a qualified electrician. Make sure the appropriate wires are connected and marettes and taped for safety


    Install Notes for Medallions 

 Imperial Productions® 

 <= PDF Version Installation Notes


 We would like to see how your medallion looks

 Send us photos to show your work 


  How to Enlarge an Existing Ceiling Medallion


 Design Tip:


You would like to make your existing medallion look larger but don't want to remove the medallion or light fixture. Why not introduce a plain or decorative ceiling ring.


The space between the medallion and the ring will be the flat drywall. Paint the ring, drywall and the existing medallion the same color.


The perfect illusion to enhance the size and design !


                                           Martin Richards Design


 Back to Main Ceiling Chapter Page 


  How to Order Products  1-800-399-7585     416-264-6096  

  email: sales@imperialproductions.com

  Imperial's Sales Policy Imperial's privacy policy   Imperial's website disclaimer   Imperial's homeland security policy    

  * All Prices & specifications in this website subject to change without notice

  * Prices are net, Freight, Taxes & Duties charged where applicable otherwise client is responsible for remittance

  * Measurements are approximate only, Final Product may vary from this website

   COPYRIGHT  MRDCI Martin Richards Design and Contracting Inc, Martin Richards DesignTM 

     and Imperial Productions®                                                        Feb 2018  all rights reserved

   Last Update  JAN-24   payment by MC/Visa with signed merchant sales draft